Unearthing the Final Secrets: Navigating to the RE9 Monitor Control Room Safe
In the nightmarish corridors of the ARK facility in
Resident Evil Requiem (RE9), players are constantly on the hunt for resources, upgrades, and vital information to survive the relentless horrors. Among the most sought-after discoveries are the game's elusive safes, each guarding precious supplies behind a cryptic combination. For many completionists and resource-strapped survivors, the
Re9 Monitor Control Room Safe represents the ultimate challenge and often the final locked treasure on their journey through the B2 Level of the ARK. Unlocking this safe not only provides a sense of accomplishment but also equips you with essential items that can turn the tide in your favor during the game's climactic moments.
This comprehensive guide will walk you through everything you need to know about the Monitor Control Room Safe: its precise location, the infamous codes for all difficulty settings, the valuable rewards awaiting inside, and strategic tips to ensure a smooth, resource-efficient retrieval. Whether you prefer to meticulously scour the environment for every clue or simply want to bypass the danger and get straight to the loot, we’ve got you covered.
Locating the RE9 Monitor Control Room Safe: Your Path Through the ARK Facility
The Monitor Control Room Safe is nestled deep within the ARK facility, an ominous, sprawling complex that serves as a late-game area in RE9. Its precise whereabouts are on the B2 Level, a section of the facility brimming with both environmental puzzles and terrifying creatures. To reach the Monitor Control Room itself, you must first gain access to the Lab Entrance, a critical progression point in the game.
Once the Lab Entrance is unlocked, your path is relatively straightforward:
- From the Lab Entrance: Proceed into the Lobby area. This central hub often serves as a temporary reprieve, but don't let your guard down.
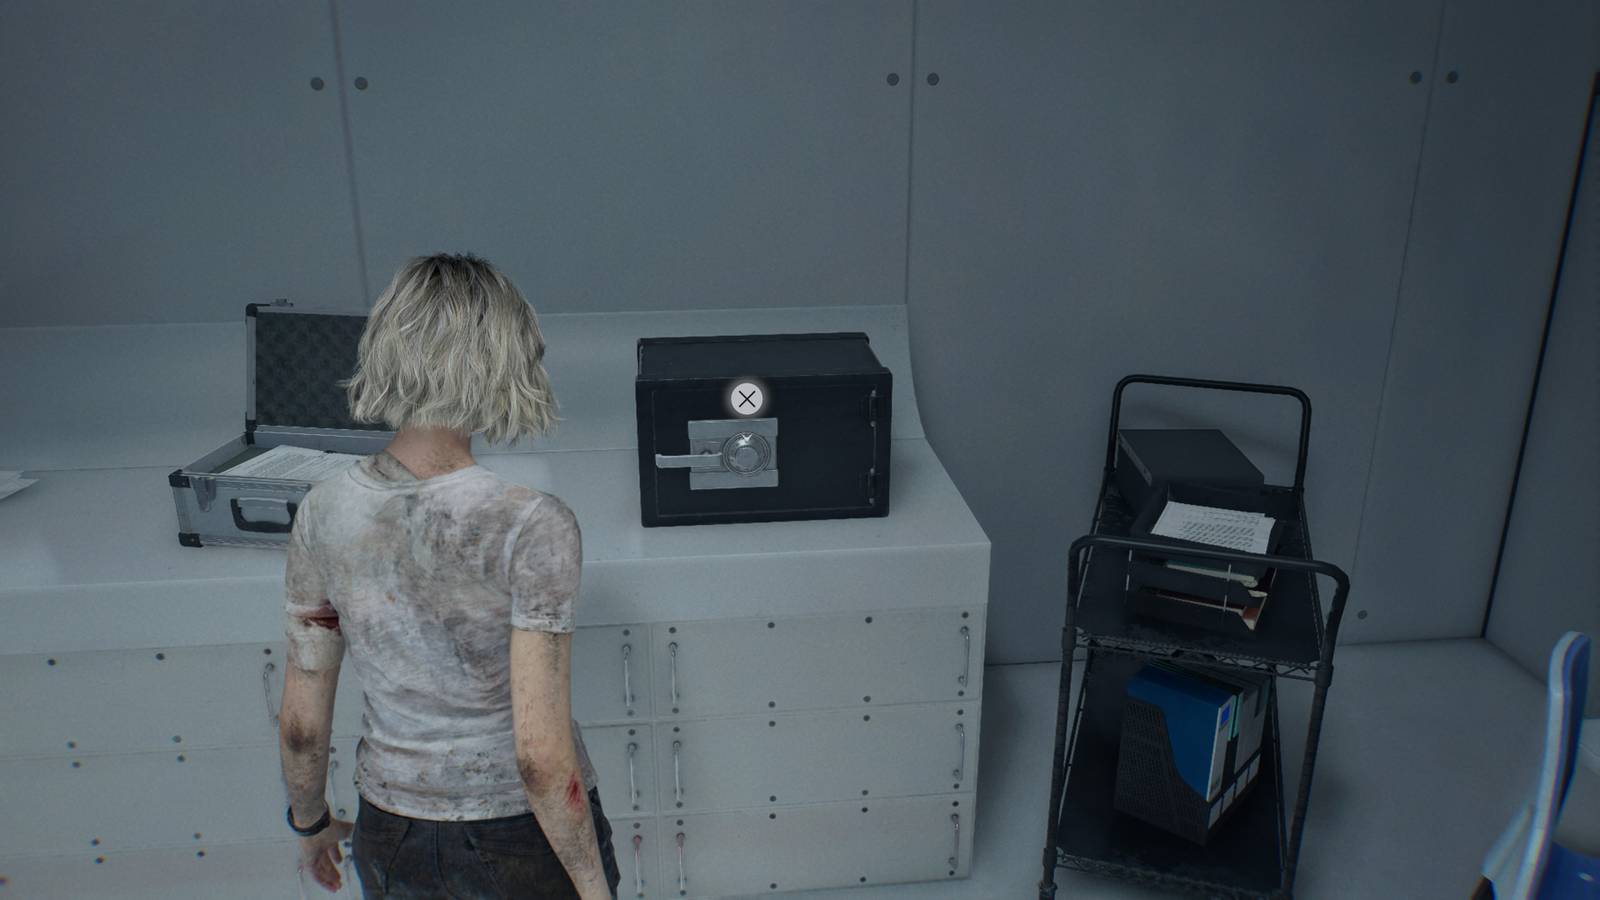
- Accessing the Monitor Control Room: From the Lobby, locate the adjacent door that leads directly into the Monitor Control Room. You'll find the safe prominently displayed within this room, a tantalizing promise of valuable gear.
The ARK facility's atmosphere is oppressive, with dimly lit corridors and the constant threat of infection. The Monitor Control Room, while seemingly safe once you're inside, is merely a brief pause before diving back into the madness. Understanding its location in relation to key areas like the Lobby and Lab Entrance is crucial for efficient navigation and planning your route, especially if you decide to backtrack for the code. For a more detailed walkthrough on reaching this pivotal area, check out our
RE9 Monitor Control Room Safe Code & Location Guide.
Cracking the Code: Re9 Monitor Control Room Safe Combinations for All Difficulties
The true challenge of any safe in Resident Evil Requiem lies in deciphering its code. The
Re9 Monitor Control Room Safe is no exception, and like other puzzles, its combination varies slightly depending on your chosen difficulty setting. For those who prefer to save their valuable resources and sanity, here are the direct codes you'll need:
Casual / Normal Difficulty Safe Code:
- Turn the dial left to 50
- Turn the dial right to 60
- Turn the dial left to 80
Insanity Difficulty Safe Code:
- Turn the dial right to 20
- Turn the dial left to 0 (zero)
- Turn the dial right to 70
Important Safe Operation Tip: For players new to Resident Evil's safe mechanics, it's vital to remember to input the
entire three-digit sequence before attempting to open the safe handle. Pulling the handle after each individual dial turn will reset the input, forcing you to start over. Patience is key!
Finding the Code In-Game (For Lore Enthusiasts and Completionists):
If you're among those who relish the thrill of discovery and want to immerse yourself fully in the ARK staff's unfortunate demise, the document containing the Monitor Control Room Safe code is indeed discoverable within the facility. The former ARK employees, in their haste or perhaps a moment of dark humor, conveniently scribbled the combination on a piece of paper.
To locate this valuable clue, you must venture into the treacherous
Bioweapon Repository 05.
- Path to the Repository: From the Monitor Control Room, you'll need to backtrack through the Lobby. Bioweapon Repository 05 is situated just down a flight of stairs from the general area you'll be navigating.
- Threat Assessment: Be warned: this area is highly dangerous. You'll encounter not only standard, shuffling zombies but also the notoriously agile and lethal Lickers. Ensure your ammunition reserves are sufficient and prepare some bottles of acid – a highly effective tool against these particular foes.
- Code Location: Within Bioweapon Repository 05, search for an open container located in the middle row on the right side of the room. The document with the safe code, along with some scrap for crafting, will be found inside.
After acquiring the code from Bioweapon Repository 05, you will need to backtrack through the Lobby once more to return to the Monitor Control Room and finally unlock your prize. This journey demands careful resource management and strategic combat, especially against the lickers who can inflict devastating damage if not handled properly.
Bountiful Rewards: What Awaits Inside the Monitor Control Room Safe
After meticulously inputting the correct code and hearing that satisfying click, the
Re9 Monitor Control Room Safe swings open to reveal a collection of highly practical items. While not a massive haul of unique weapons, these rewards are incredibly valuable, especially given the late-game context in which this safe is typically encountered:
- One Bottle of Acid: Acid is a potent throwable weapon in RE9, incredibly effective against armored enemies and, crucially, against Lickers. Having an extra bottle can provide crucial crowd control or a burst of damage against a tough foe.
- One Empty Bottle: This seemingly innocuous item is a cornerstone of resource management in RE9. Empty Bottles can be combined with other components found throughout the ARK facility to craft a variety of essential tools, including more Acid, powerful healing mixtures, or even specialized grenades.
- One Med Injector: The Med Injector is RE9's premium healing item, restoring a significant portion of your health instantly. In the face of intense boss battles or relentless enemy encounters in the ARK facility, a single Med Injector can be the difference between survival and a gruesome death.
These items, when combined, offer a powerful boost to your combat readiness and healing capabilities. The acid helps manage common threats, the empty bottle allows for flexible crafting, and the Med Injector provides a critical lifeline, ensuring you're well-prepared for the final stretch of Resident Evil Requiem.
Strategic Considerations & Pro Tips for Safe Retrieval
Deciding whether to simply use the provided safe codes or to embark on the dangerous journey to find the document yourself involves a strategic assessment of your current resources and playstyle.
*
Resource Management vs. Time: If your inventory is flush with ammo and healing items, and you enjoy exploring every nook and cranny for lore, then seeking out the code in Bioweapon Repository 05 is a rewarding experience. However, if you're low on supplies or simply want to progress efficiently, using the direct code is undoubtedly the more pragmatic choice. Fighting through Bioweapon Repository 05, especially against Lickers, can quickly deplete precious ammo and health.
*
Dealing with Lickers: Should you choose to retrieve the code in-game, be prepared for Lickers. These creatures are blind but possess acute hearing.
- Stealth: Moving slowly and quietly can help you bypass them without engaging.
- Acid: As mentioned, acid is highly effective. A well-placed bottle can stun or even eliminate multiple Lickers.
- Shotgun: If stealth fails, a shotgun blast to the head is usually the quickest way to put them down, but it consumes heavy ammo.
*
Backtracking Efficiency: The need to backtrack to Bioweapon Repository 05 and then back to the Monitor Control Room adds to the risk. Plan your route carefully, identifying potential shortcuts or safe zones. Consider clearing the path of enemies on your first pass if you intend to return.
*
Value of Rewards: The rewards from the safe – acid, an empty bottle, and a Med Injector – are especially beneficial in the late game. Acid is versatile, the empty bottle gives you crafting flexibility (whether it's another healing item or an offensive one), and the Med Injector can save you from a critical situation. Don't underestimate their utility.
Unlocking the
Re9 Monitor Control Room Safe is more than just a simple puzzle; it's a test of your resourcefulness and strategic thinking in the harrowing world of Resident Evil Requiem. Whether you choose to face the gauntlet of Bioweapon Repository 05 for the in-game clue or opt for the direct combination, the valuable supplies within will undoubtedly aid you in your fight against the horrors that infest the ARK facility.
Conclusion
The Monitor Control Room Safe stands as one of the final, most satisfying challenges for players navigating the terrifying depths of Resident Evil Requiem's ARK facility. Whether you're a lore-hungry explorer determined to uncover every secret or a pragmatic survivor prioritizing efficiency, the knowledge of its location and codes is invaluable. The rewards—an extra bottle of acid, a crucial empty bottle for crafting, and a life-saving Med Injector—are perfectly suited to the late-game dangers you face. By understanding the environment, preparing for the threats, and utilizing the provided combinations, you can confidently unlock the
Re9 Monitor Control Room Safe, secure its vital contents, and bolster your chances of escaping the horrors of the ARK facility in RE9. Good luck, survivor!